
Please disclose if any significant portion of your mod was created using AI tools by adding the 'AI Generated' category. Failing to do so may result in the mod being removed from Thunderstore.
5. Building guide
Updated a week ago5. Building guide
The pictures and numbers below were computed with Fysik's own solver and the default materials, using the same pieces you build with. In game, pieces snap a little differently, so expect similar, not identical, numbers.
Squeeze, don't bend
A piece is far stronger squeezed or pulled along its length than bent across it. A post under a roof is squeezed and barely notices; a beam reaching out is bent, and the joint where it leaves its support carries the whole reach. The stress grows with the square of the length: half again as far out means more than twice the stress.
- With 4 m core wood logs and floors on top, a balcony 8 m out is comfortable (43%), 12 m out is just under the limit (97%) and 16 m out falls.
- A diagonal brace turns the bending into a squeeze: two 45° logs from the ground to the first joint bring the 12 m balcony back to 44%.
- The brace pushes back against whatever it stands on. Give the house a diagonal (or a solid wall), or the push bends its posts instead.
Arches
An arch turns the weight into a squeeze that follows its curve, so it spans far more than a flat beam. This bridge is 24 m long with 20 m clear underneath; hanging the deck from the arch takes it from 52% down to 42%.
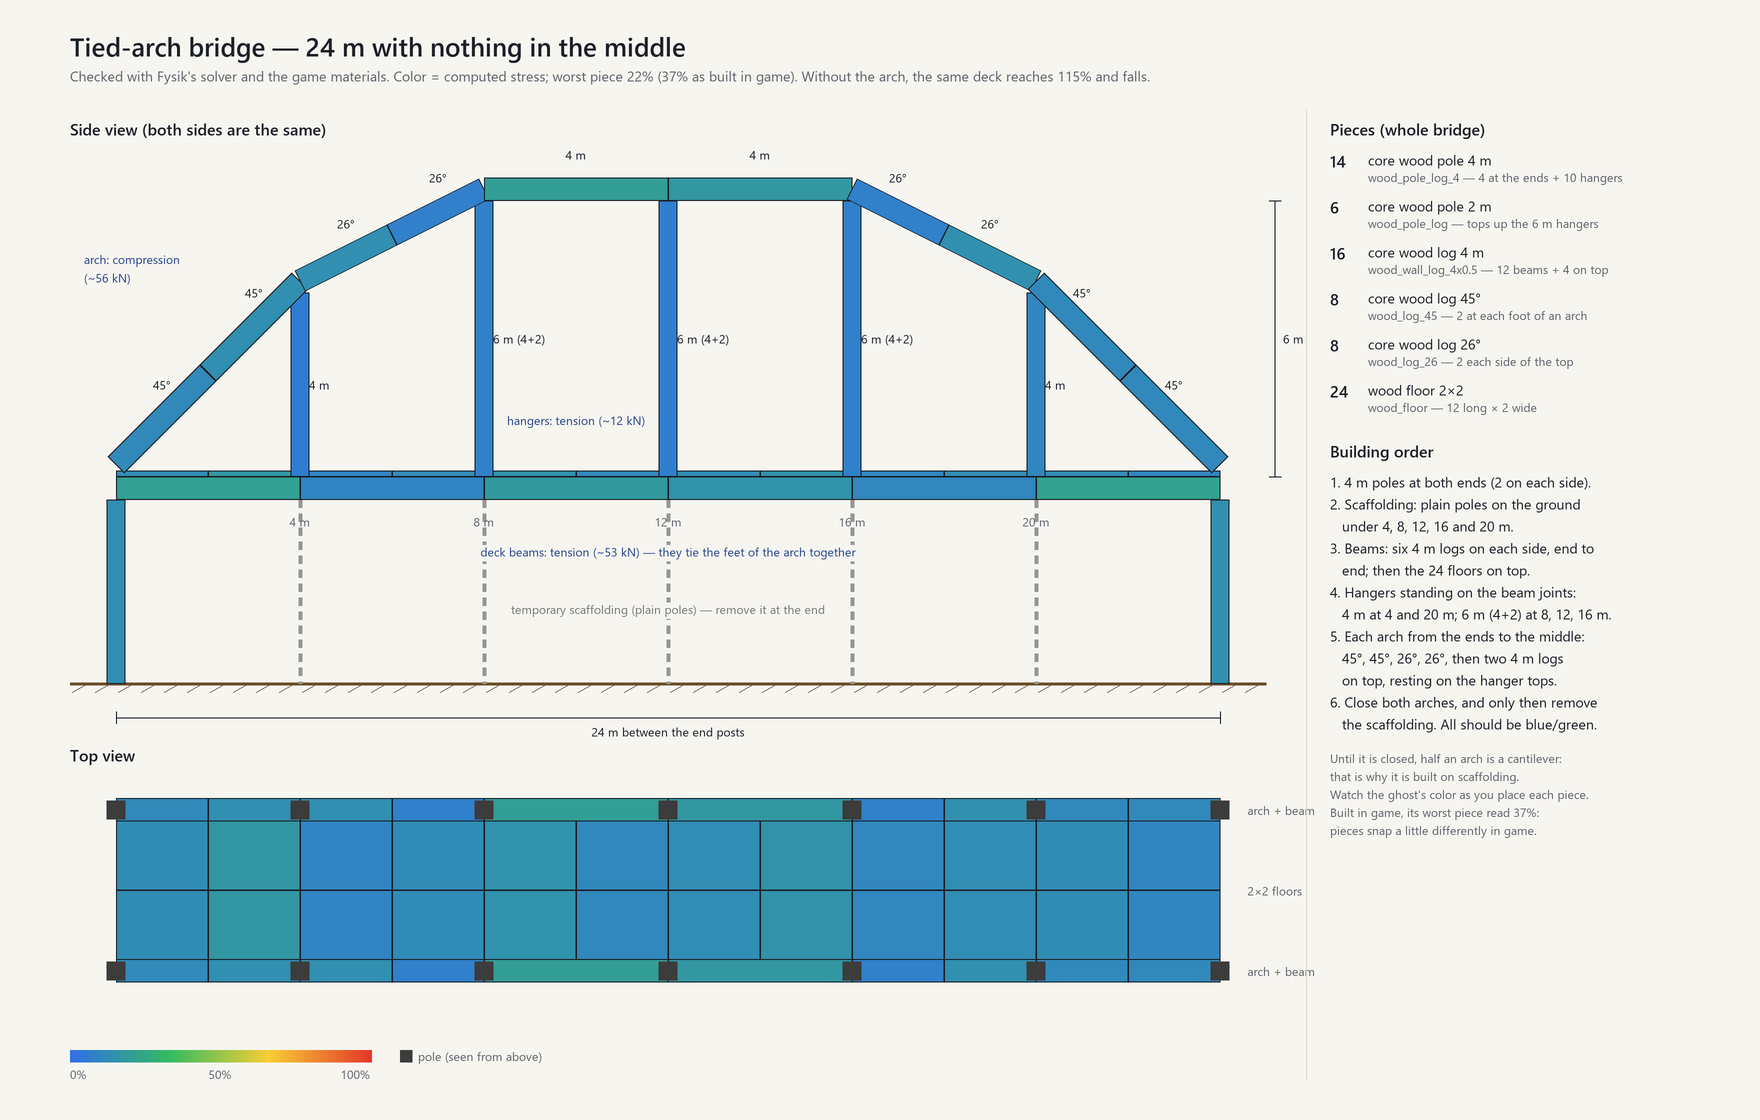
- Prop it while you build. Until the arches close, the hangers and half arches hang on the deck and push the corner posts to 84%. One plain pole under the middle of each side keeps everything below 36%; remove the poles once both arches are closed.
- Hold its feet. An arch pushes outwards where it lands. Here the deck beams tie the two feet together (in tension, about 47 kN); otherwise set the feet against the ground or a heavy wall.
- Hang the deck from it. Poles from the arch down to the deck (hangers) carry the deck in tension.
- Two posts per corner. A deck flexes, and a lone post glued under its end gets bent (72%); two posts 2 m apart hold it straight (16%).
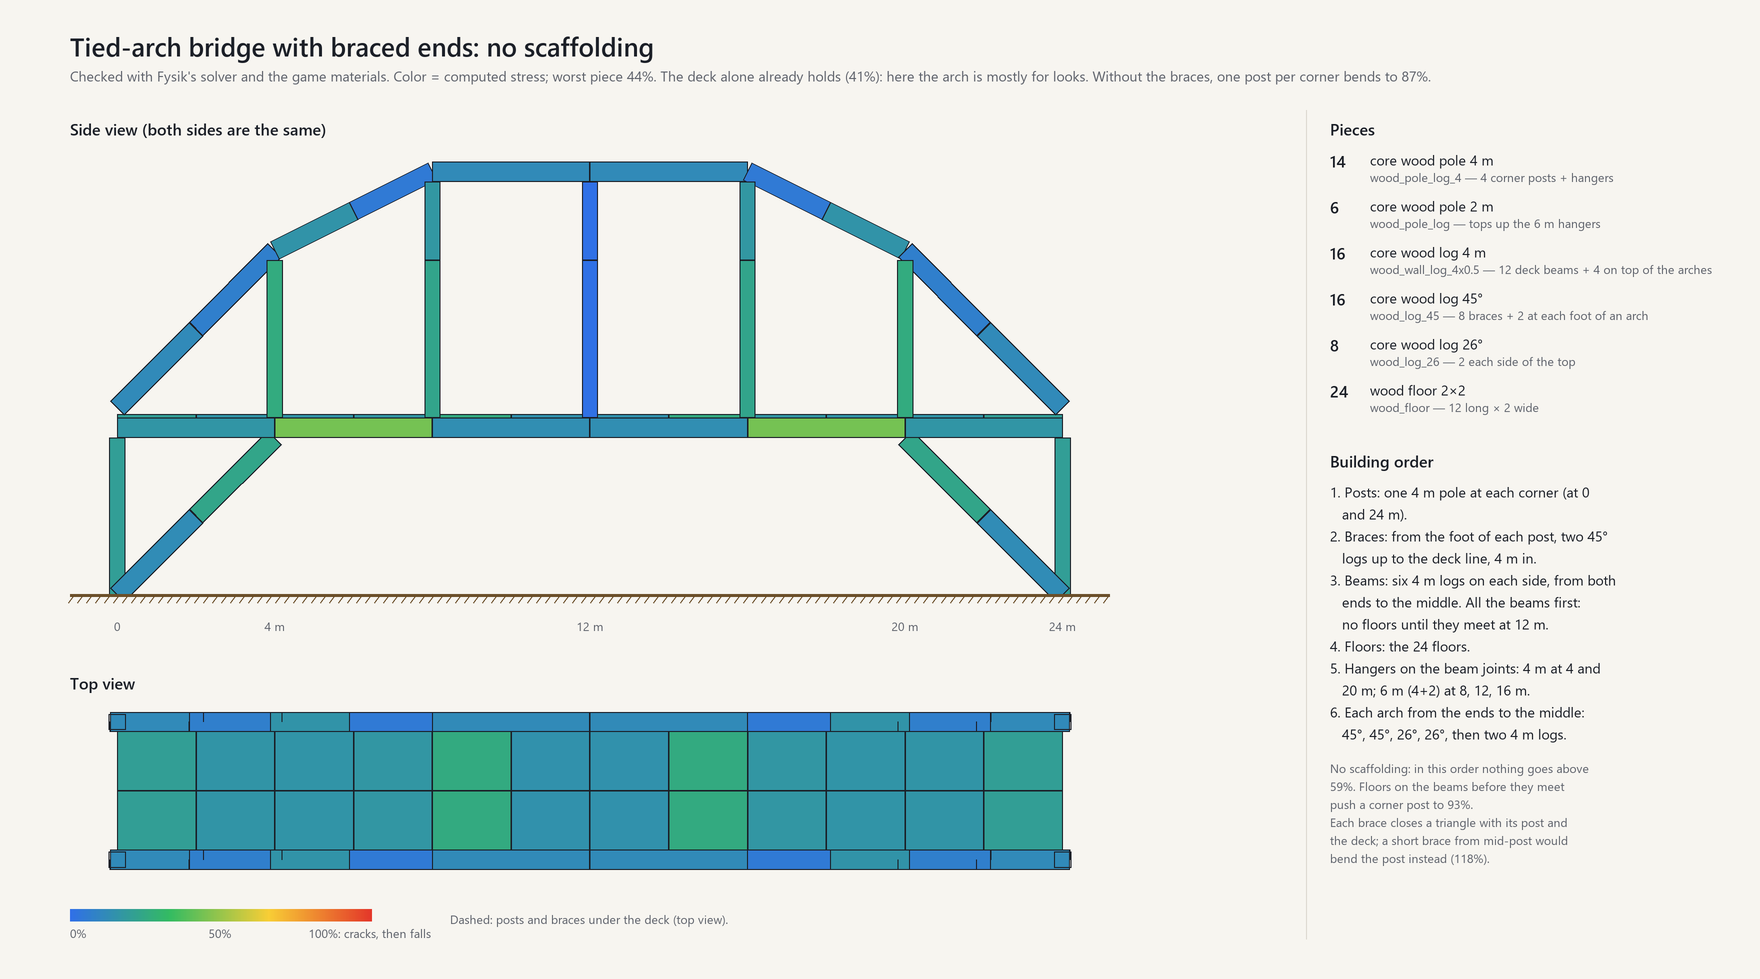
- Or brace the ends. Two 45° logs from the foot of each post up to the deck close a triangle, and the same bridge needs no scaffolding: nothing goes above 56% while it is built, as long as all the beams meet before the floors go on. The deck then holds on its own (38%), so the arch is for looks.
Wider gaps and boats
To leave more water free, put the structure under the deck and let stone take the ends. In the pictures, temporary props are dashed: build with them, then take them away.
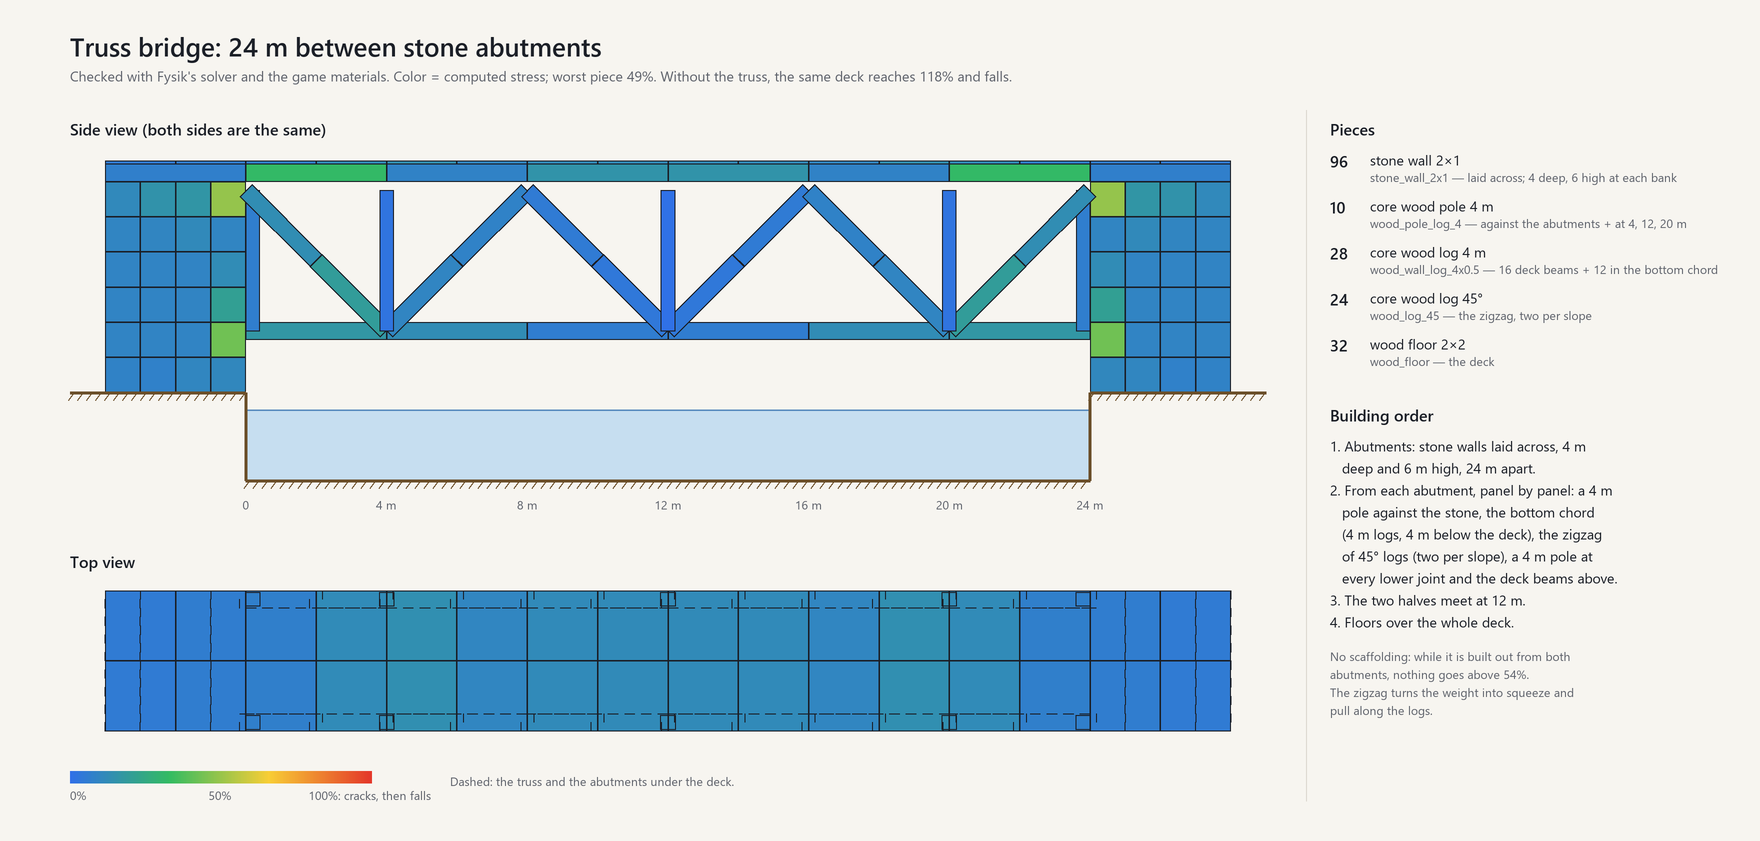
- Truss. A zigzag of 45° logs between the deck and a bottom chord 4 m below turns the weight into squeeze and pull along the logs: worst piece 58% between stone abutments 24 m apart, where the deck alone would reach 98%, right at its limit. Build it out from both abutments, panel by panel: nothing goes above 60% on the way, so it needs no scaffolding.
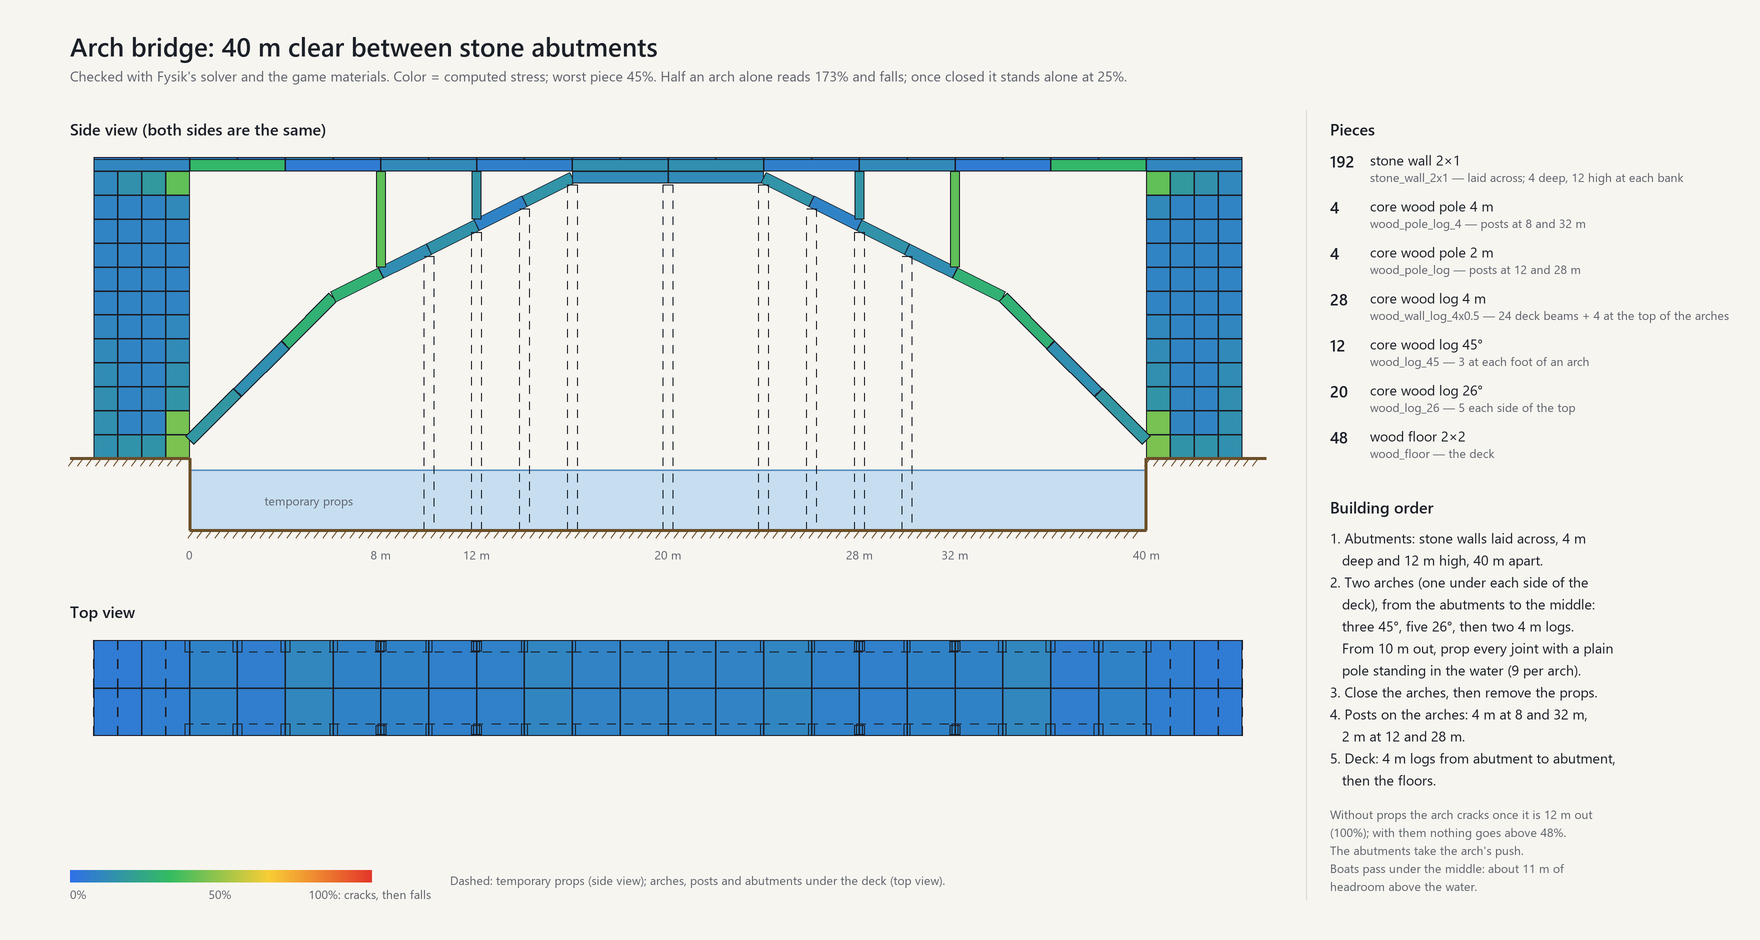
- Arch under the deck. With heavy stone abutments to push against, a wooden arch leaves 40 m of water clear, with about 11 m of headroom for boats in the middle: worst piece 54%. Without props the arch reaches 97% once it is 12 m out and falls soon after; a plain pole standing in the water under every joint from 10 m out keeps it below 54%. Once closed it stands on its own (22%) and the props come out.
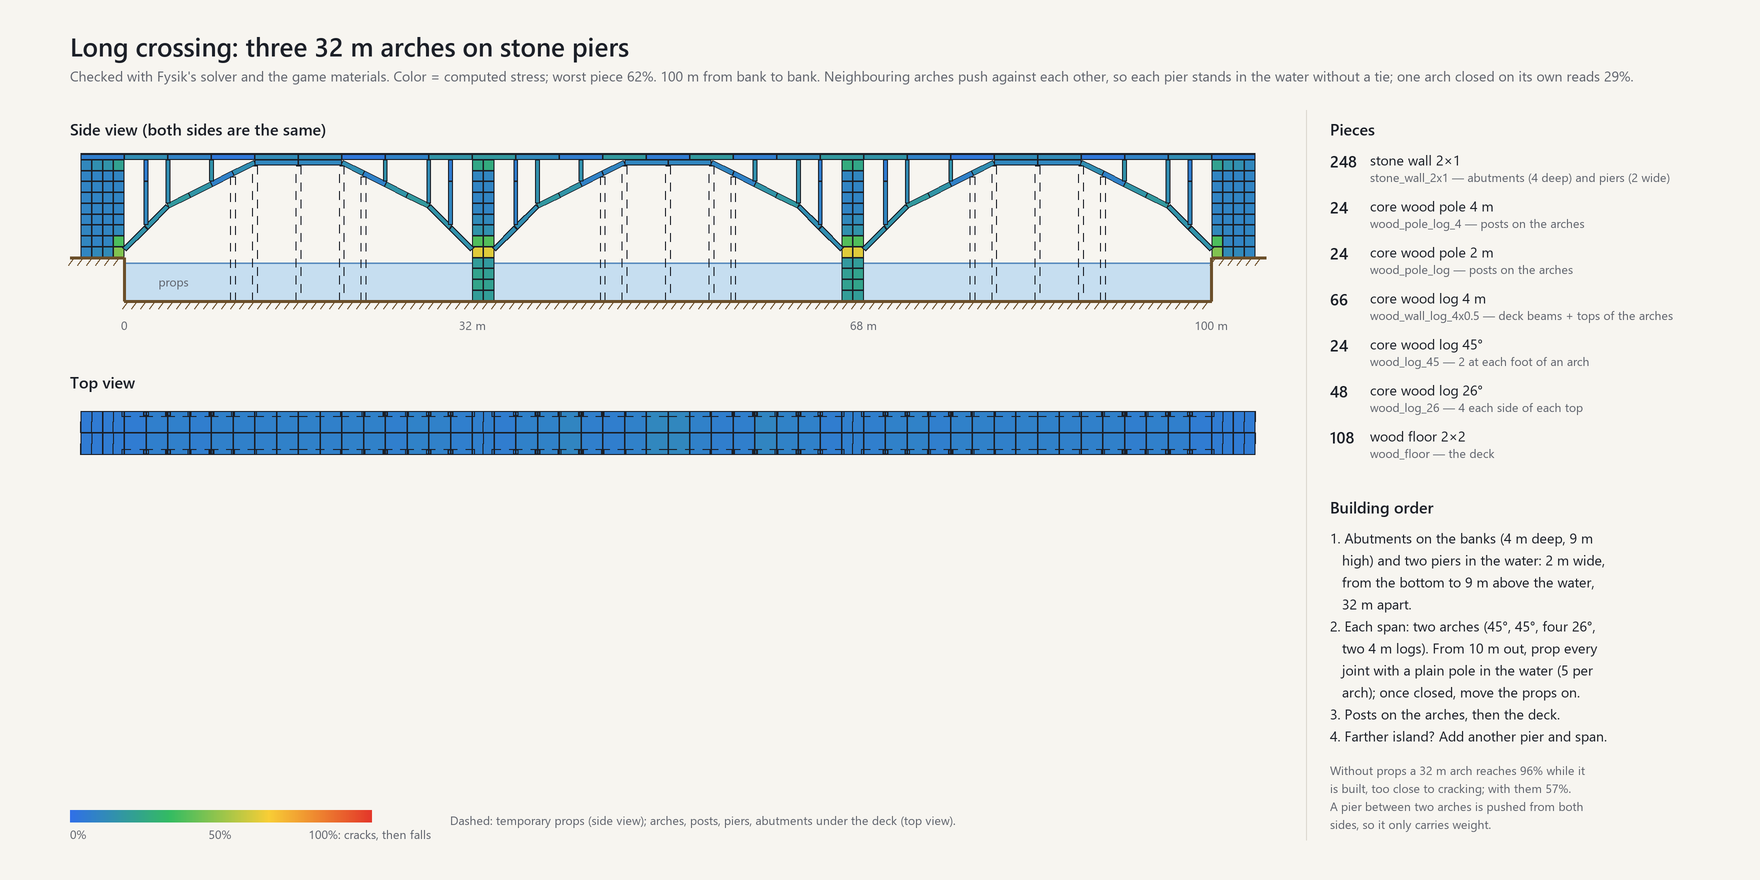
- Farther islands. Repeat the span on stone piers standing in the water. Between two arches a pier is pushed from both sides and only carries weight: three 32 m arches cross 100 m at 73%. Prop each arch from 10 m out as it is built (it reaches 93% without), then move the props to the next span.
Stone is masonry
Stone, black marble and grausten rest on each other like real masonry: they carry any squeeze, but a joint between two stones never pulls (the theory, with drawings, is in How it works). A stone stays where it is as long as the weight on it passes through the area where it touches the stones below; when the weight leans past that edge, the stone rocks on it, and when it is pushed sideways harder than friction holds, it slides.
- A stone needs something under its weight. A block reaching out past the one below holds while its weight stays over it: less than half its length out, and less still with more stones on its outer end. Weigh down its back end with the stones above and a wall can step out course after course (a corbel).
- What falls: a stone stuck to the side of a wall, a slab with nothing under its edge, a block left over a doorway with nothing under it, half an arch before its keystone. The hammer says Unstable · would fall.
- Span an opening with a lintel (a stone or a beam resting on both sides) or an arch.
- Lay walls in running bond, each stone over the joint of the two below: the wall then works as one. Stones stacked straight up stand as separate columns.
- Floors upstairs need walls, pillars, arches or wooden beams under them. The stone floor is a 2 × 2 × 1 m block of 9.6 t: laid half on a 1 m wall and half over the room, its weight sits right on the edge of the wall (close to 100%). Put a beam under its inner half, or use the thin stone floor (half the weight, see below) or wooden floors.
- Tipping and Sliding on the hammer tell how close a stone's worst joint is to rocking or slipping.
Building with arch stones
The arch stones are wedge-shaped stones next to the stone arch in the hammer, one kind for each arch: half circles 4 to 16 m wide inside and about half as high.
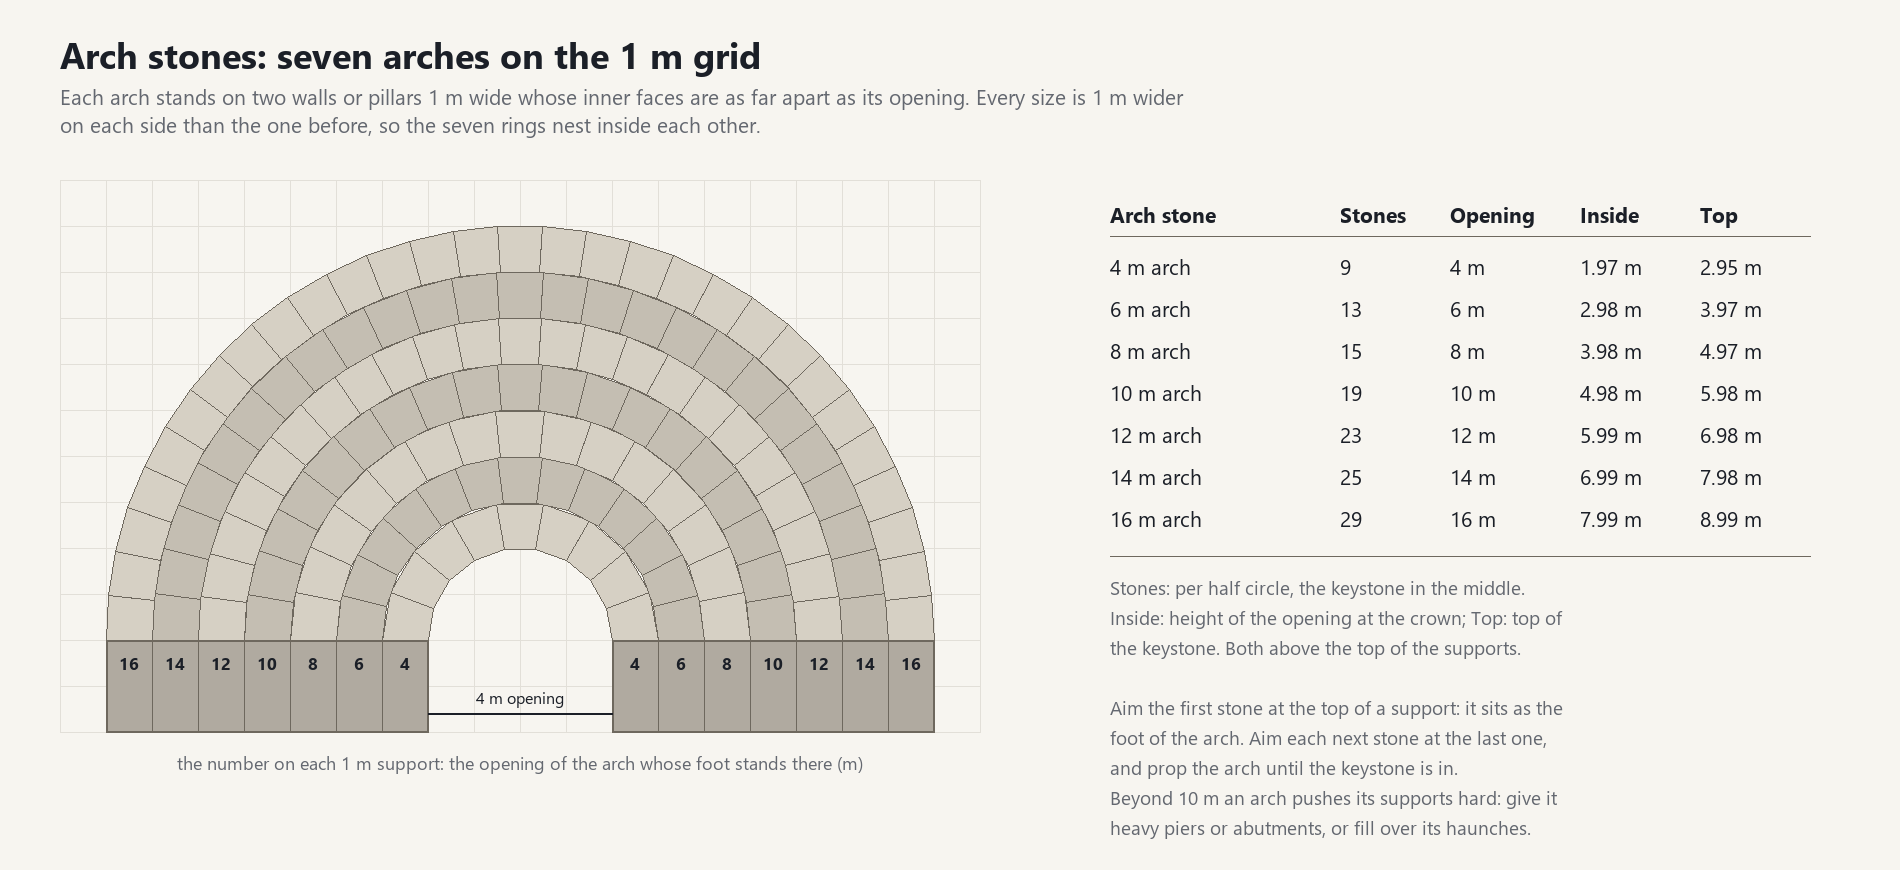
- Supports first: two walls or pillars 1 m wide, their inner faces as far apart as the arch's opening.
- Lay the stones: aim the first stone at the top of a support and it sits as the foot of the arch, snapped to it; then aim at that stone, and each next stone carries on the curve up to the keystone. Do the same from the other support.
- Prop it until it closes: half an arch tips over, so stand plain poles under its stones (centering) and take them away once the keystone is in, or once the fill above it is up.
- Beyond 10 m an arch pushes its supports hard: give it heavy piers or abutments, or fill over its haunches.
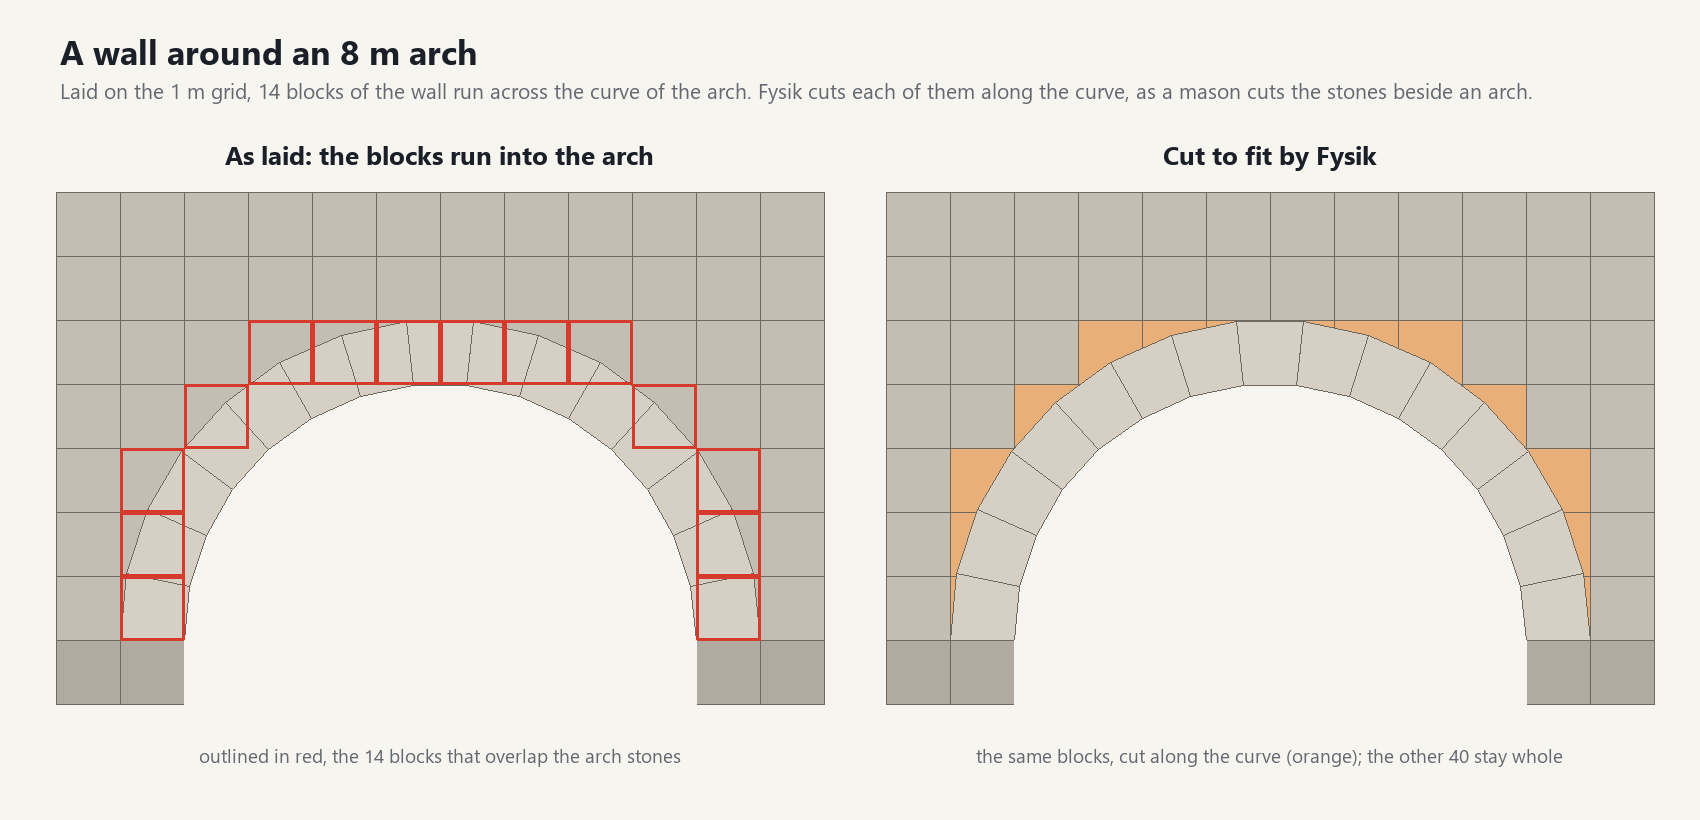
- Close it in with a wall: lay stone walls, blocks and floors on the grid around the arch. Where one runs into an arch stone it is cut along the arch's curve, its look, its collider and its weight, the way masons cut the stones beside an arch. Blocks laid before the arch are cut when its stones go in, and become whole again if the arch stones are taken out. The cut shows a moment after the piece is placed.
Thin walls and floors
Next to the stone walls and the stone floor in the hammer are thin versions of them, 0.5 m thick instead of a metre: thin stone walls 1x1, 2x1 and 4x2, and thin stone floors 2x2 and 1x1. They cost and weigh half as much (a thin 2x2 floor is 4.8 t instead of 9.6 t) and keep the grid: two thin walls make one, and they snap flush with either face of a 1 m wall or floor.
- Floors upstairs: aim a thin floor at the top of a wall, pillar or beam and it lies on it, covering its top flush with the far face and reaching towards you, lined up with the wall's end on the metre grid. Elsewhere it snaps like any floor; to pick which corner of a floor you hold, press Q or E.
- Thin walls are weaker: as masonry, a wall half as thick tips over more easily under a load that leans on one side, such as a floor resting only on its edge, and carries less on top.
Round towers
Tower stones are curved stones, 1 m high: sixteen close a ring 4, 6, 8 or 10 m across outside, in two thicknesses, 1 m and 0.5 m, and four of them make a rounded corner between two straight walls. A 4 m tower with 1 m walls is barely 2 m wide inside and its stones are strongly tapered: it stands, but reads higher on the hammer than the wider ones.
- The first stone goes anywhere, turned with the mouse wheel like any piece.
- Aim at the side of a tower stone to lay the next one along the ring, or at its top to start the course above: each stone of the new course sits across a joint below, so the courses bind like a running-bond wall. Aiming at the floor or anything else within 1 m of the end of a tower stone also carries on its ring.
- Half stones end a course flush: at a doorway, start and end every second course with a half stone so both sides of the opening run straight, and span the top with a lintel.
- A rounded corner: four stones from one straight wall to the other; their ends meet the walls on the grid, and half stones finish the courses that are offset.
- Thinner higher up: a thin course laid on a thick one keeps the outside of the tower flush.
- Walls and floors fit the tower: a stone wall, block or floor that runs into a tower stone is cut along the curve, flush with the outside, or with the inside for a wall or floor within the tower, even if it reaches past the tower's wall. A floor is cut only where it sits within a course, not when it lies on top of one. The cut shows a moment after the piece is placed.
- Wood fits too: wooden floors, wall panels and roofs are cut the same way, so a wooden floor inside the tower closes up to the wall. Beams, poles and logs are never cut: a joist or a lintel can rest in the wall, and a beam can run through it to carry a balcony outside.
- Lay the first course on level ground or on a floor: a tower stone with nothing under its weight falls, like any stone.
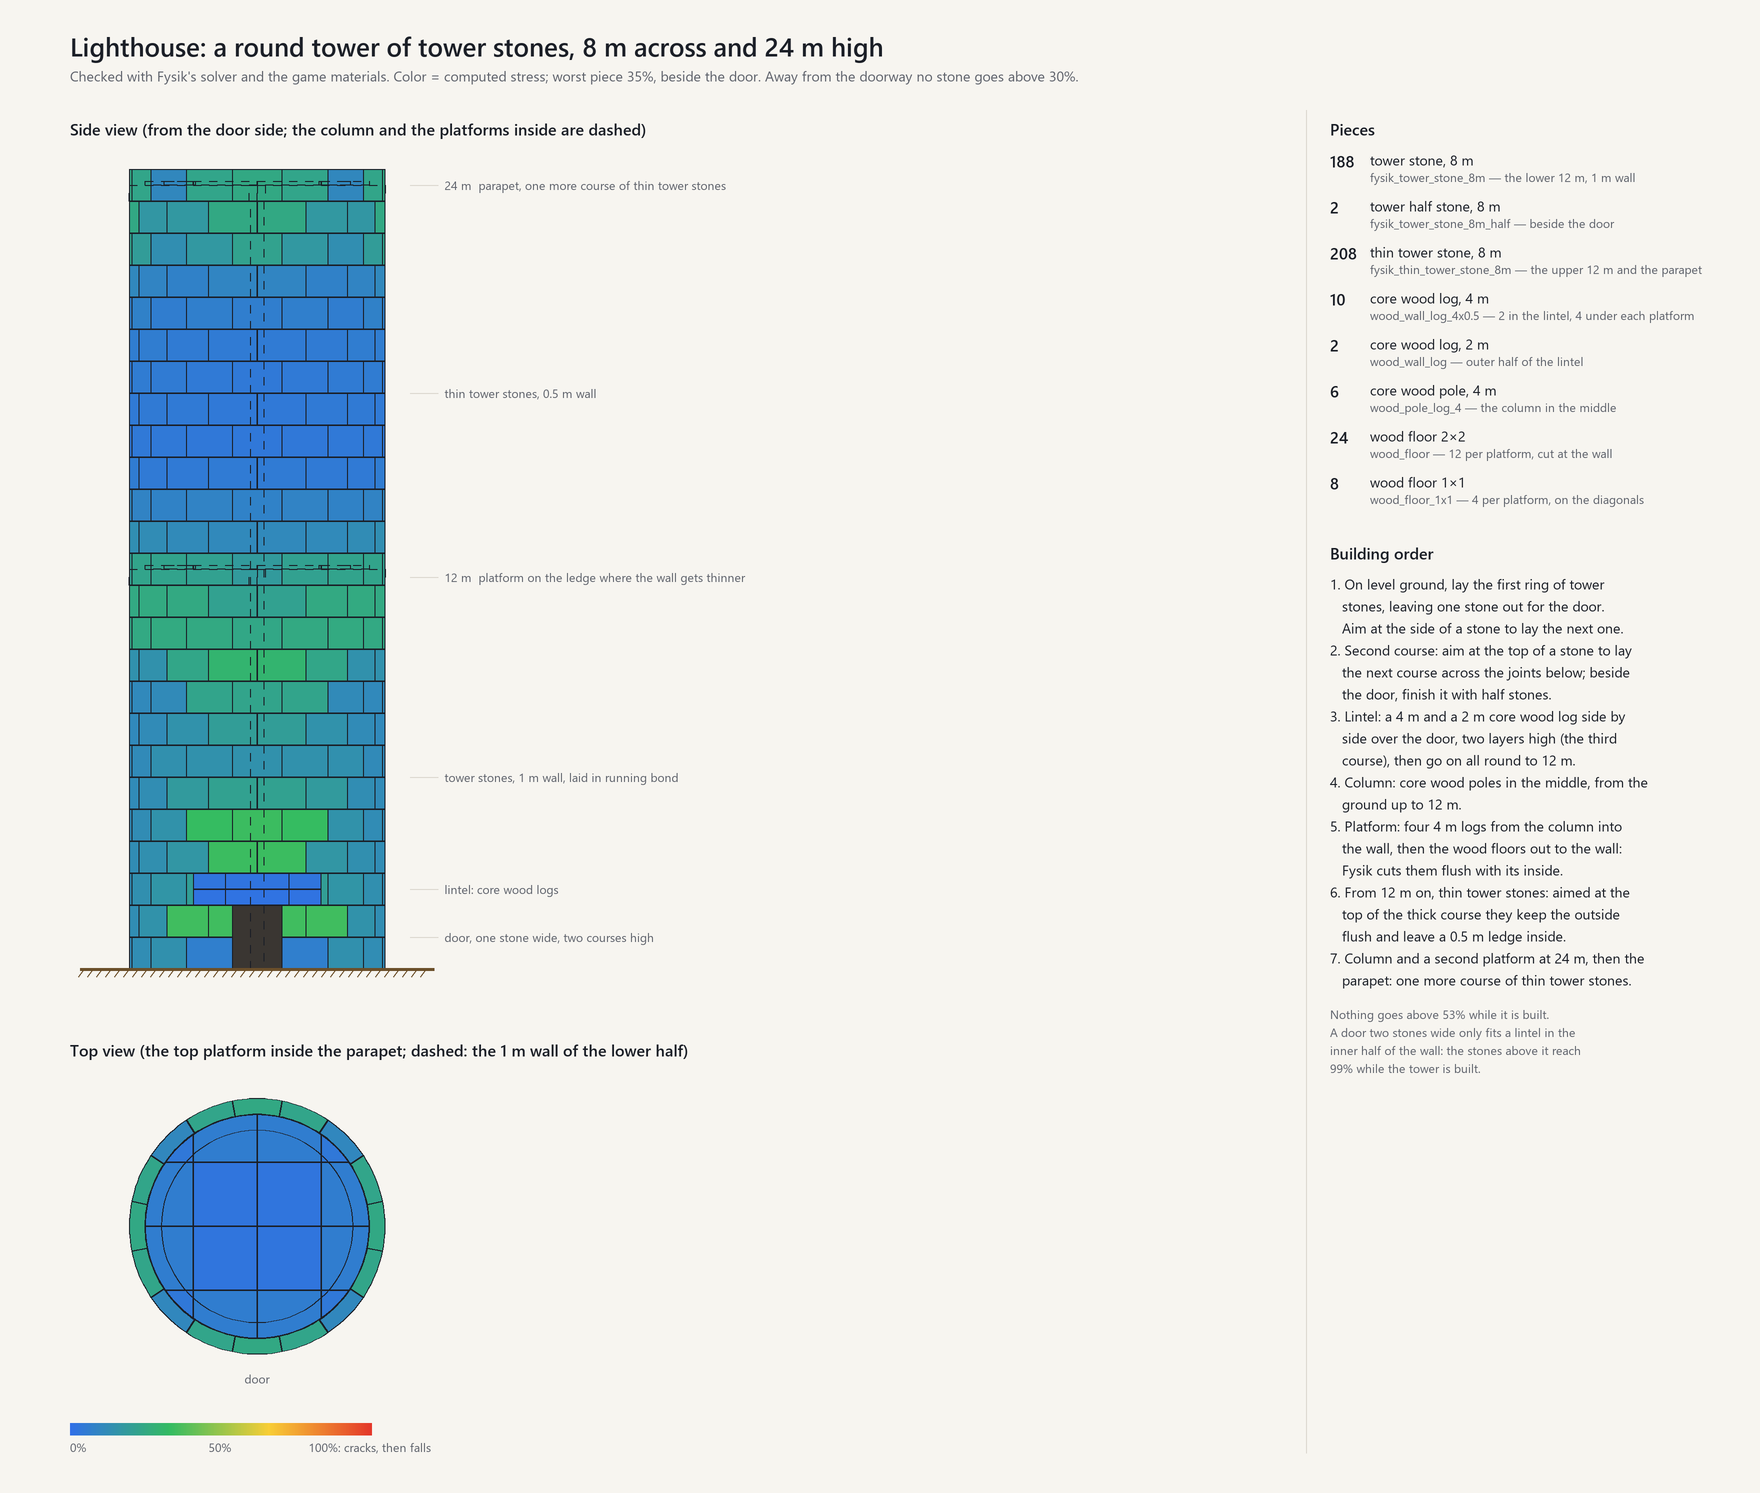
A lighthouse 8 m across and 24 m high: tower stones with a 1 m wall up to 12 m, thin ones above, a doorway one stone wide under a lintel of core wood logs, and two wooden platforms on joists laid into the wall. Its worst stone, beside the door, reads 35%, and nothing goes above 53% while it is built.
Castles
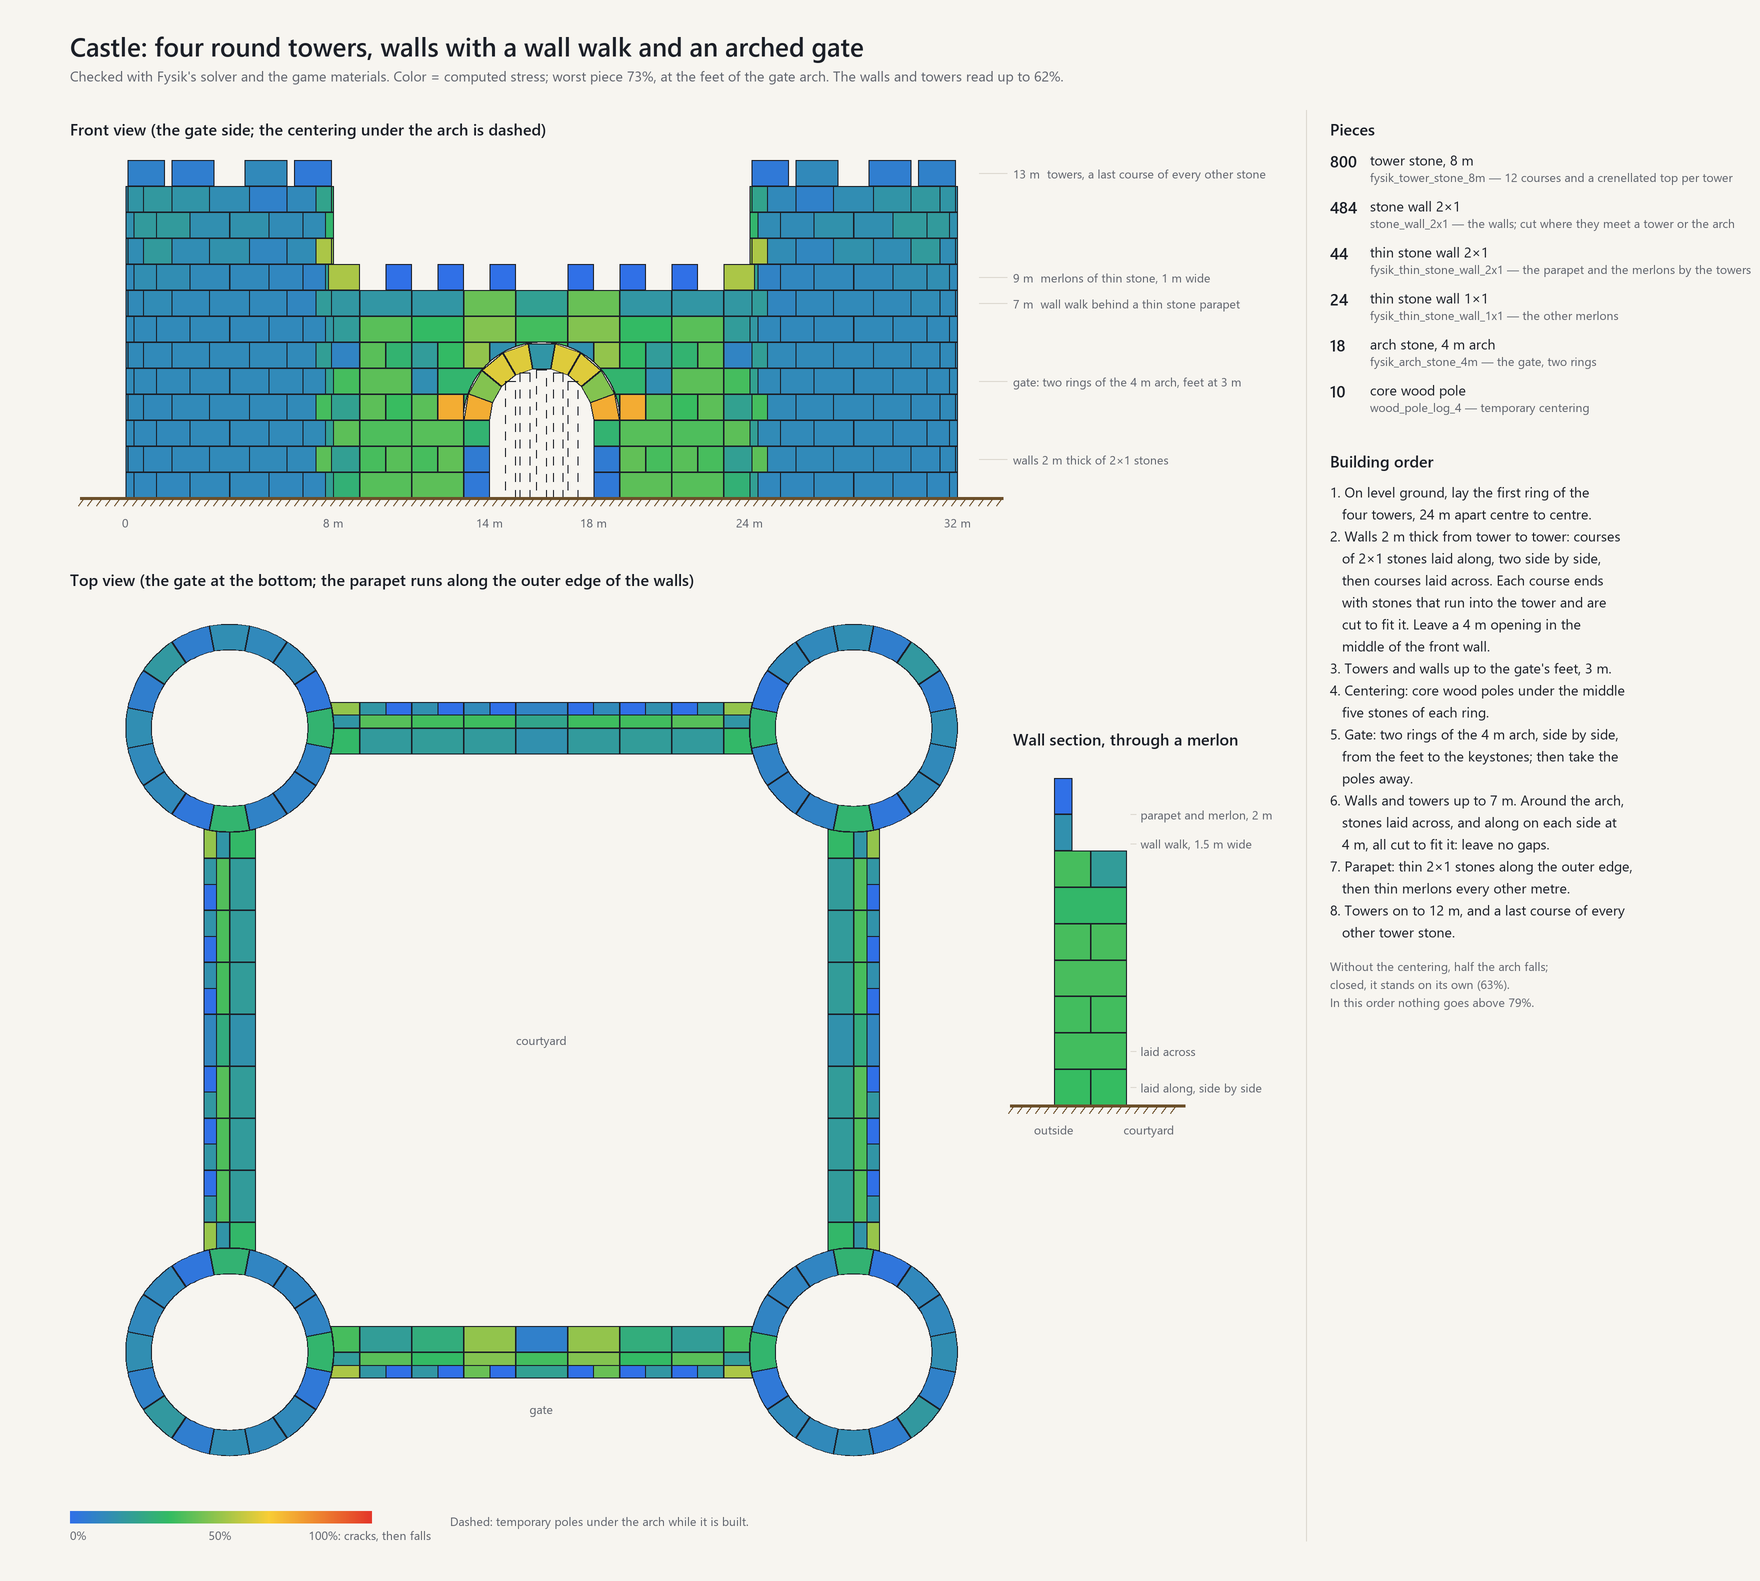
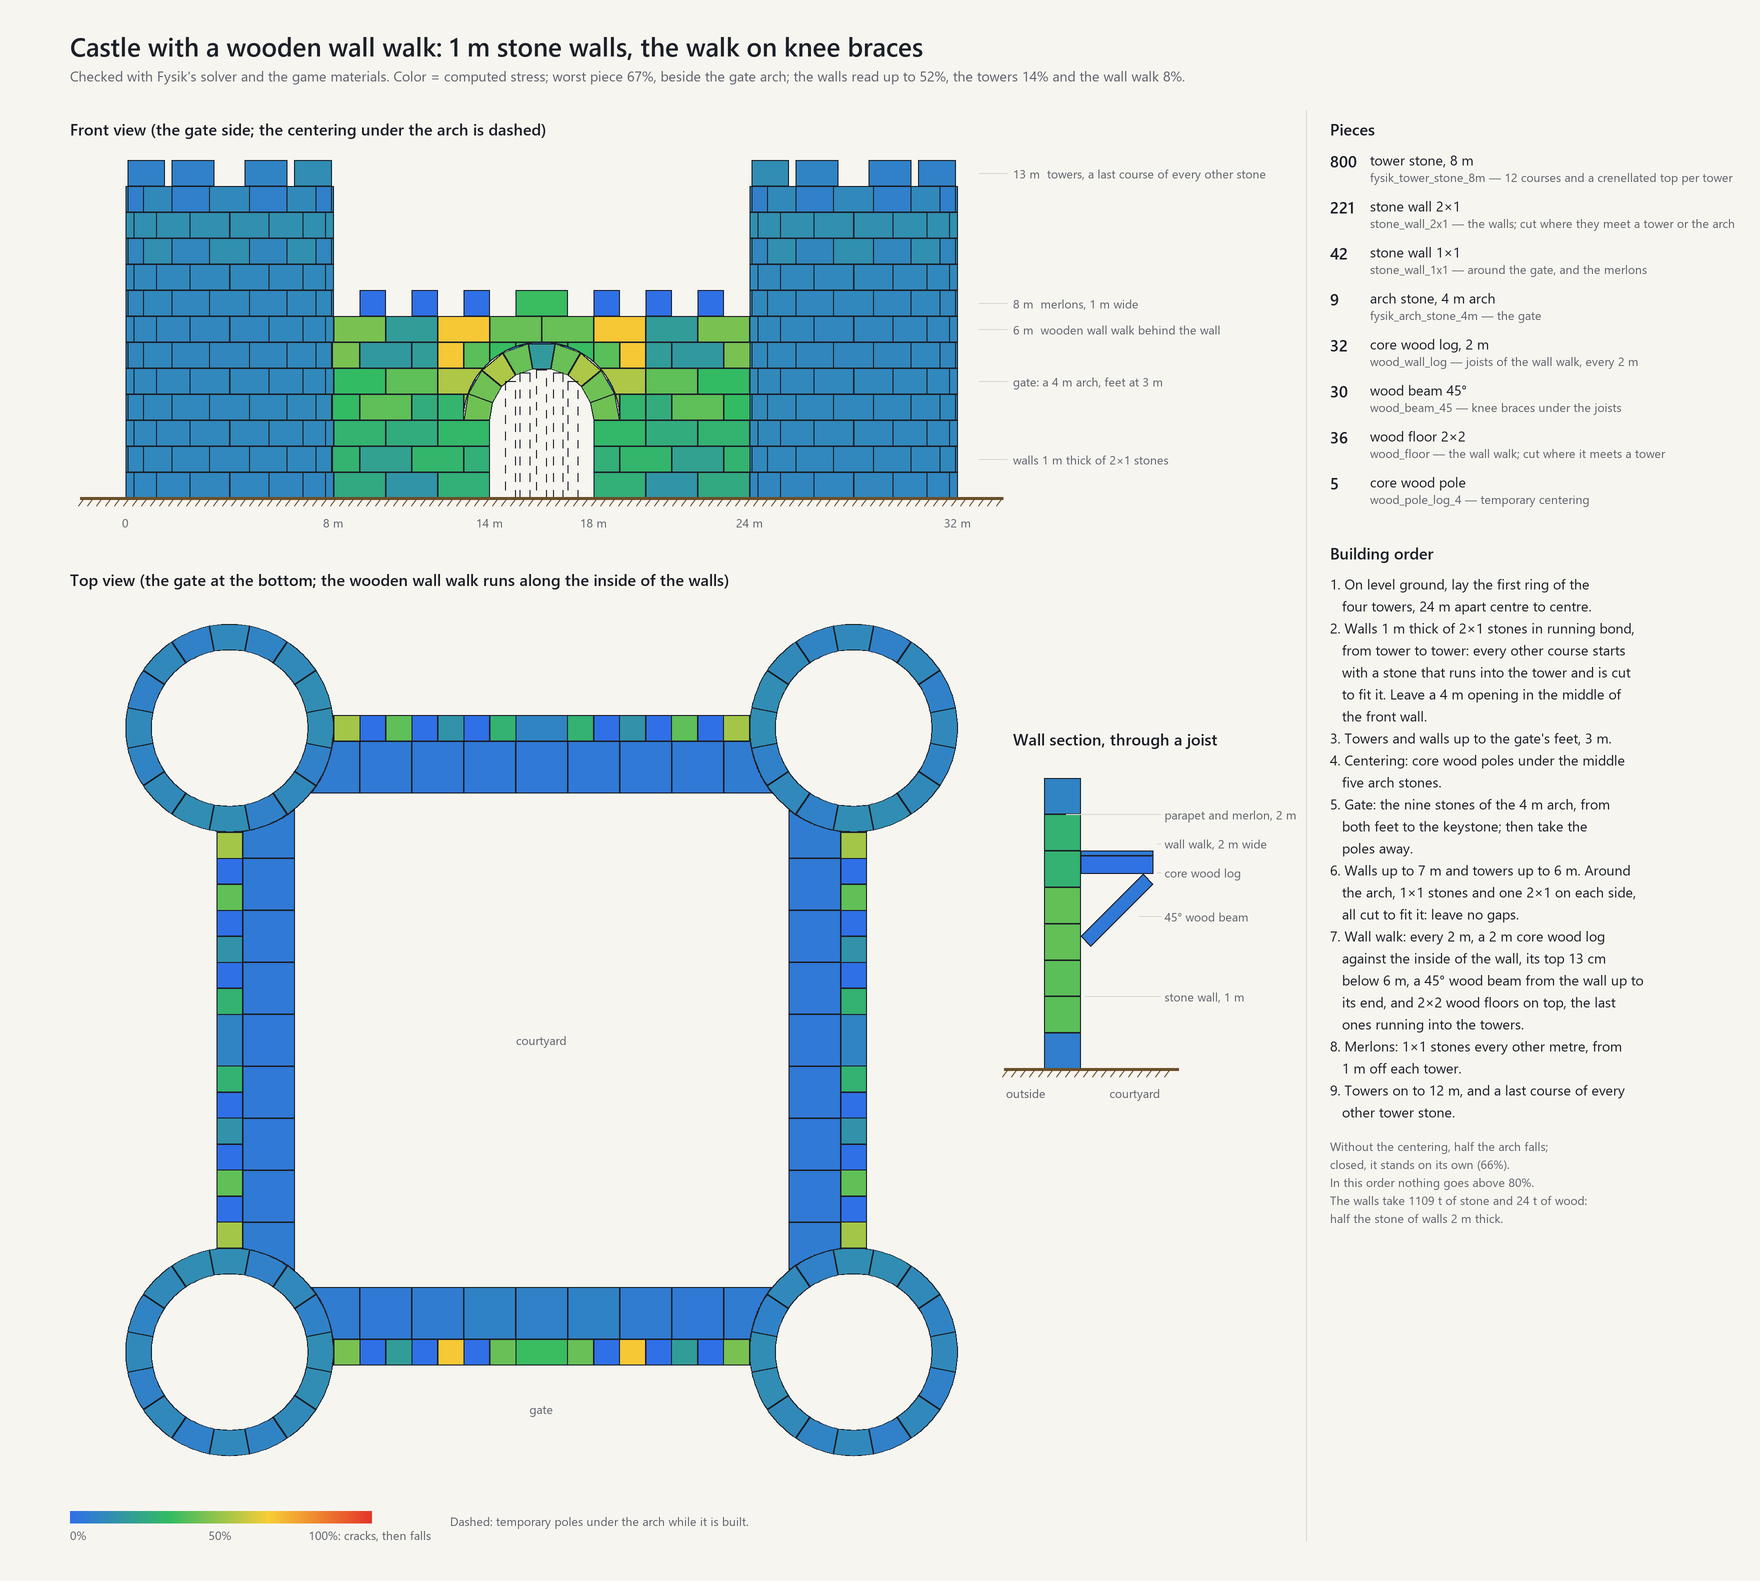
Round towers at the corners, walls between them that run into the towers and are cut to fit, a gate under an arch, and a wall walk for the defenders behind merlons: two ways to build the walls, one all stone and one with half the stone and a walk of wood. Both have four towers 8 m across and 13 m high, 24 m apart at the corners of a square.
Walls 2 m thick with a stone wall walk. The walls are 7 m high, of 2×1 stones: courses laid along, two side by side, alternating with courses laid across that tie them, every course ending with stones that run into the towers and are cut to fit them. Defenders stand on a walk 1.5 m wide behind a parapet of thin stone 1 m high, with merlons every other metre that bring it to 2 m. The gate in the front wall is two rings of the 4 m arch side by side, every stone around it cut to fit, so no gap is left. Worst piece 73%, at the feet of the arch; the walls and towers read up to 62%. Build the arch on centering and take the poles away once the keystones are in: the closed arch stands on its own (63%), and nothing goes above 79% while the castle is built.
Walls 1 m thick with a wooden wall walk. The same towers, a gate under one ring of the 4 m arch, and a walk on the courtyard side: every 2 m a 2 m core wood log stands out from the inside of the wall just below 6 m, a 45° wood beam braces its end against the wall, and 2×2 wood floors lie on top, the last ones running into the towers, which cut them to fit. The wall rises 1 m above the walk and its merlons another metre. The walls take 1109 t of stone and 24 t of wood, against 2192 t of stone for walls 2 m thick. Worst piece 67%, beside the gate arch; the wall walk reads 8%, and nothing goes above 80% while it is built.
Stone bridges
A pair of stone arches (stone_arch) closes 4 m; wider arches are built of arch stones, the
wedge-shaped stones next to the stone arch in the hammer.
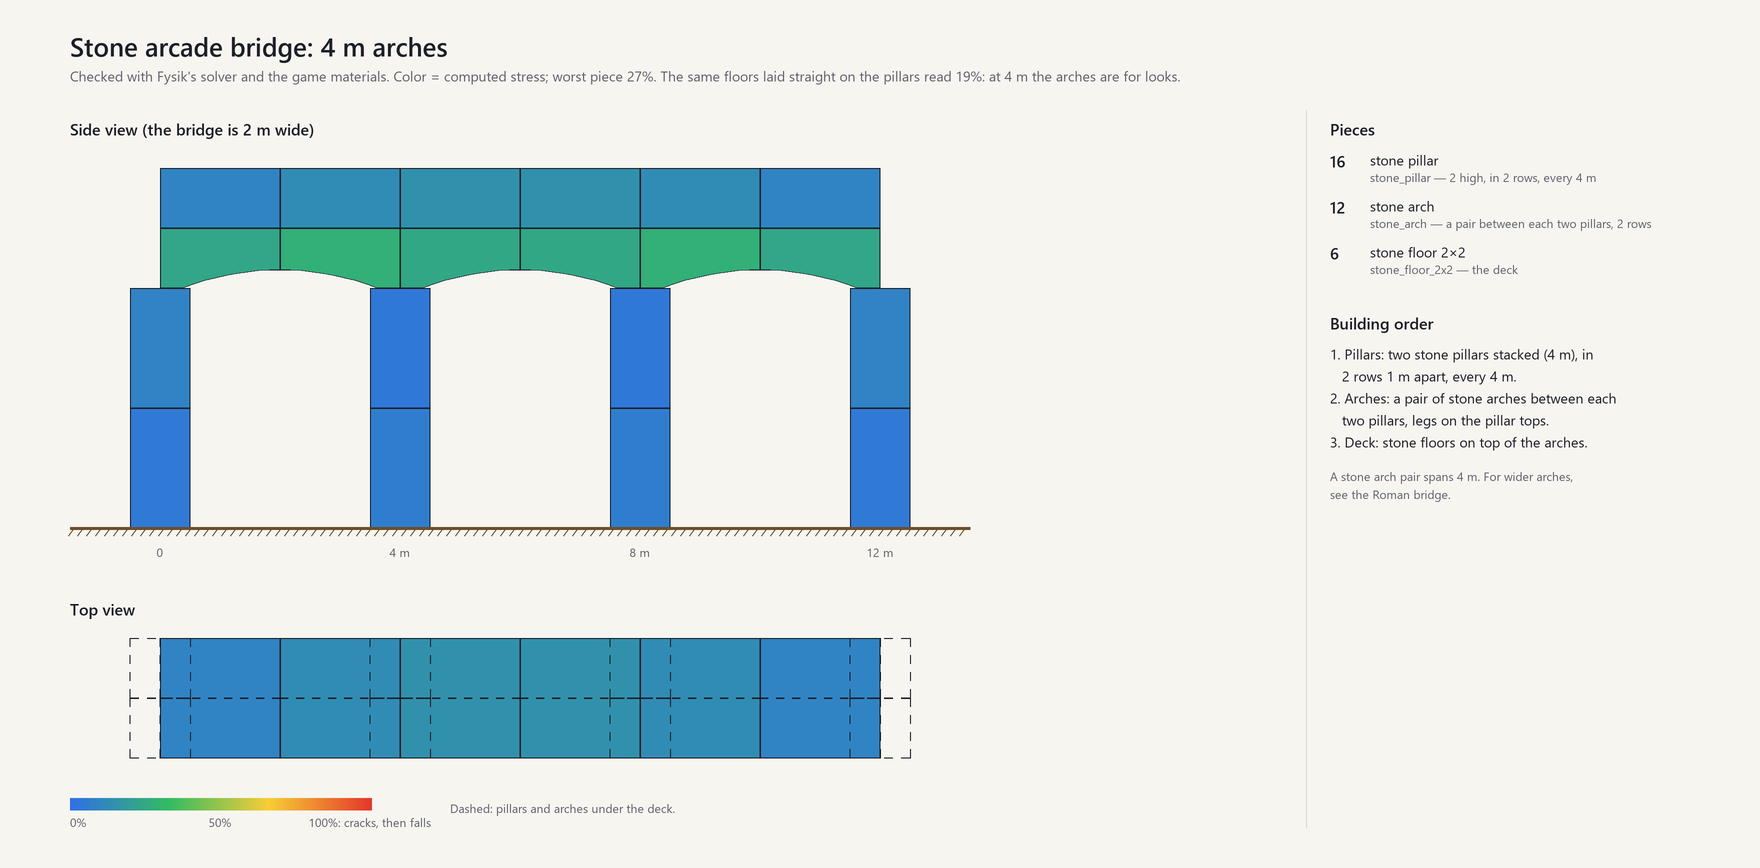
- Pillars every 4 m, a pair of stone arches between each two, stone floors on top: worst piece 65%. The same floors laid straight on the pillars read 83%.
- The first stone arch of a pair rests on its pillar by one end only and tips off on its own: stand a plain pole in the middle of the opening, its top where the two arches meet, and take it away once the second arch closes the pair (59% while the first one rests its tip on it).
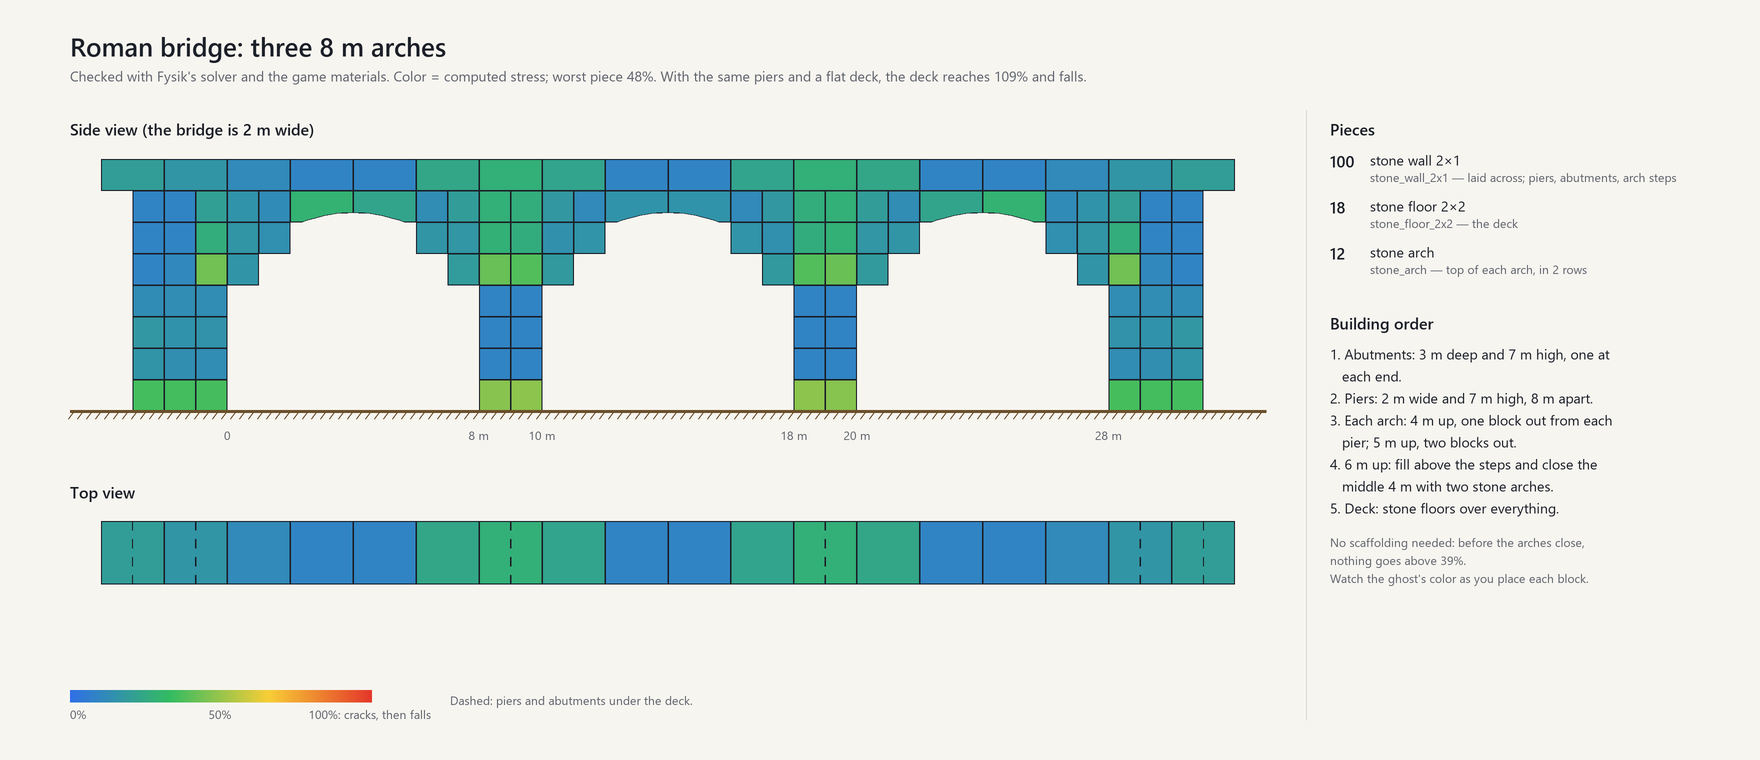
- Three 8 m arches of arch stones on piers 2 m wide, two rings side by side, the space above them filled with stone walls that are cut to fit around the arches: worst piece 77%. Leave out the few blocks that would be cut down to a sliver.
- Build each arch on centering. Until its keystone is in, half an arch tips over. A plain pole under every arch stone from the fourth to the twelfth holds it: nothing goes above 81% while it is built.
- Fill before you take the props away. The bare arches read 90%; the stone over their haunches presses them into shape and brings the bridge down to 77%.
Snow
Snow weighs on whatever is left in the open, mostly roofs. With full snow at the default weight and 26° roofs of wood:
- A house up to 8 m wide with posts every 2 to 4 m under the eaves and the ridge stays below 40%.
- A 12 m hall with posts every 4 m reaches about 65%. A 16 m hall with posts every 4 m under the eaves and every 8 m under the ridge is already at 47% with no snow and gives way when the snow is about two thirds deep.
- Steep roofs shed snow: the same 16 m hall with 45° roofs holds full snow at about 74%.
- A roof sticking out from a wall with nothing under it holds one roof piece out (24%), not two (112%).
- Shovel the roof when something starts to crack, or prop it from below.
Carts on bridges
A cart weighs about 1.9 t full of wood, core wood or stone, 5.5 t full of ore and 6.6 t full of metal bars (see What weighs). With the cart on the worst spot of a 4 m wide deck, core wood logs with floors on top unless the row says otherwise:
| Bridge | Empty | Wood | Ore | Bars |
|---|---|---|---|---|
| Posts every 4 m | 6% | 17% | 39% | 46% |
| Posts every 8 m | 13% | 22% | 43% | 50% |
| Floors on 2 m wood beams, posts every 4 m | 8% | 24% | 54% | 63% |
| 12 m span, posts only at the ends | 29% | 40% | 62% | 69% |
| 16 m span, posts only at the ends | 49% | 63% | 101% | 113% |
| Tied arch, 24 m (above) | 14% | 18% | 37% | 44% |
| Truss, 24 m (above) | 58% | 61% | 75% | 78% |
| Arch under the deck, 40 m (above) | 54% | 71% | 85% | 85% |
- A bridge with posts every 4 to 8 m, or any of the bridges above, carries any cart.
- Long spans resting only on their ends are where carts matter: wood crosses a 16 m span easily, ore and metal bars take it just past its limit. For heavy loads, put a post in the middle, a truss under the deck or an arch.
- A cart that stops on an overloaded bridge brings it down. Moving, it may make it across a bridge that is only just too weak, while the pieces under it crack and stop again behind it.
Materials
- Stone is very strong squeezed and weak pulled: use it for walls, pillars and arches, not for beams or overhangs, and give every stone something under its weight (see Stone is masonry).
- Core wood (logs) is stronger than wood; iron is strong in every direction.
- Long, thin pieces buckle: a slender post carries less than its material alone would allow.
Tips
- Watch the ghost's color before placing each piece, and check the whole building with the X-ray (F7) after big changes.
- When something cracks, you have a few seconds: put a post under it, add a brace, or remove what it carries (a stack of iron bars is 360 kg, a cart full of ore about 5.5 t).
- Before taking a loaded cart across a bridge, look at the bridge with the X-ray, and keep moving.
- Badly damaged pieces (below half health) are weaker; repair them.
- Big bases: structures up to
Structure.MaxFrameBodiespieces (2000) get the full calculation. Larger ones use a simpler model that does not recognise arches or masonry; raise the limit (up to 5000) if you build arches into a big base. - Too hard or too easy? Ask your server admin about
Structure.Difficulty.
