
Please disclose if any significant portion of your mod was created using AI tools by adding the 'AI Generated' category. Failing to do so may result in the mod being removed from Thunderstore.
B0 - Choosing a Workflow
Updated 2 weeks agoChoosing a Workflow
Graphics · start here. One question decides everything downstream: which sprite system draws the thing you want to change? This page is the map — the two systems, how the workflows stack, and exactly what the finished files look like.
Silksong draws its art with two different sprite systems, and they are different enough that Stitchwork gives each its own tools:
- tk2d — the animated world. Hornet, enemies, bosses, most things that move. Sprites live in shared atlases managed by the 2D Toolkit engine.
- T2D (plain Unity
Texture2D) — everything else, and it's a lot: attack effects, particles, UI, menus, and static scene props (a busy scene can hold over a thousand of these).
Not sure which one your target is? Don't guess — point World Pick at it. The pick lands you in the right tool automatically.
The map
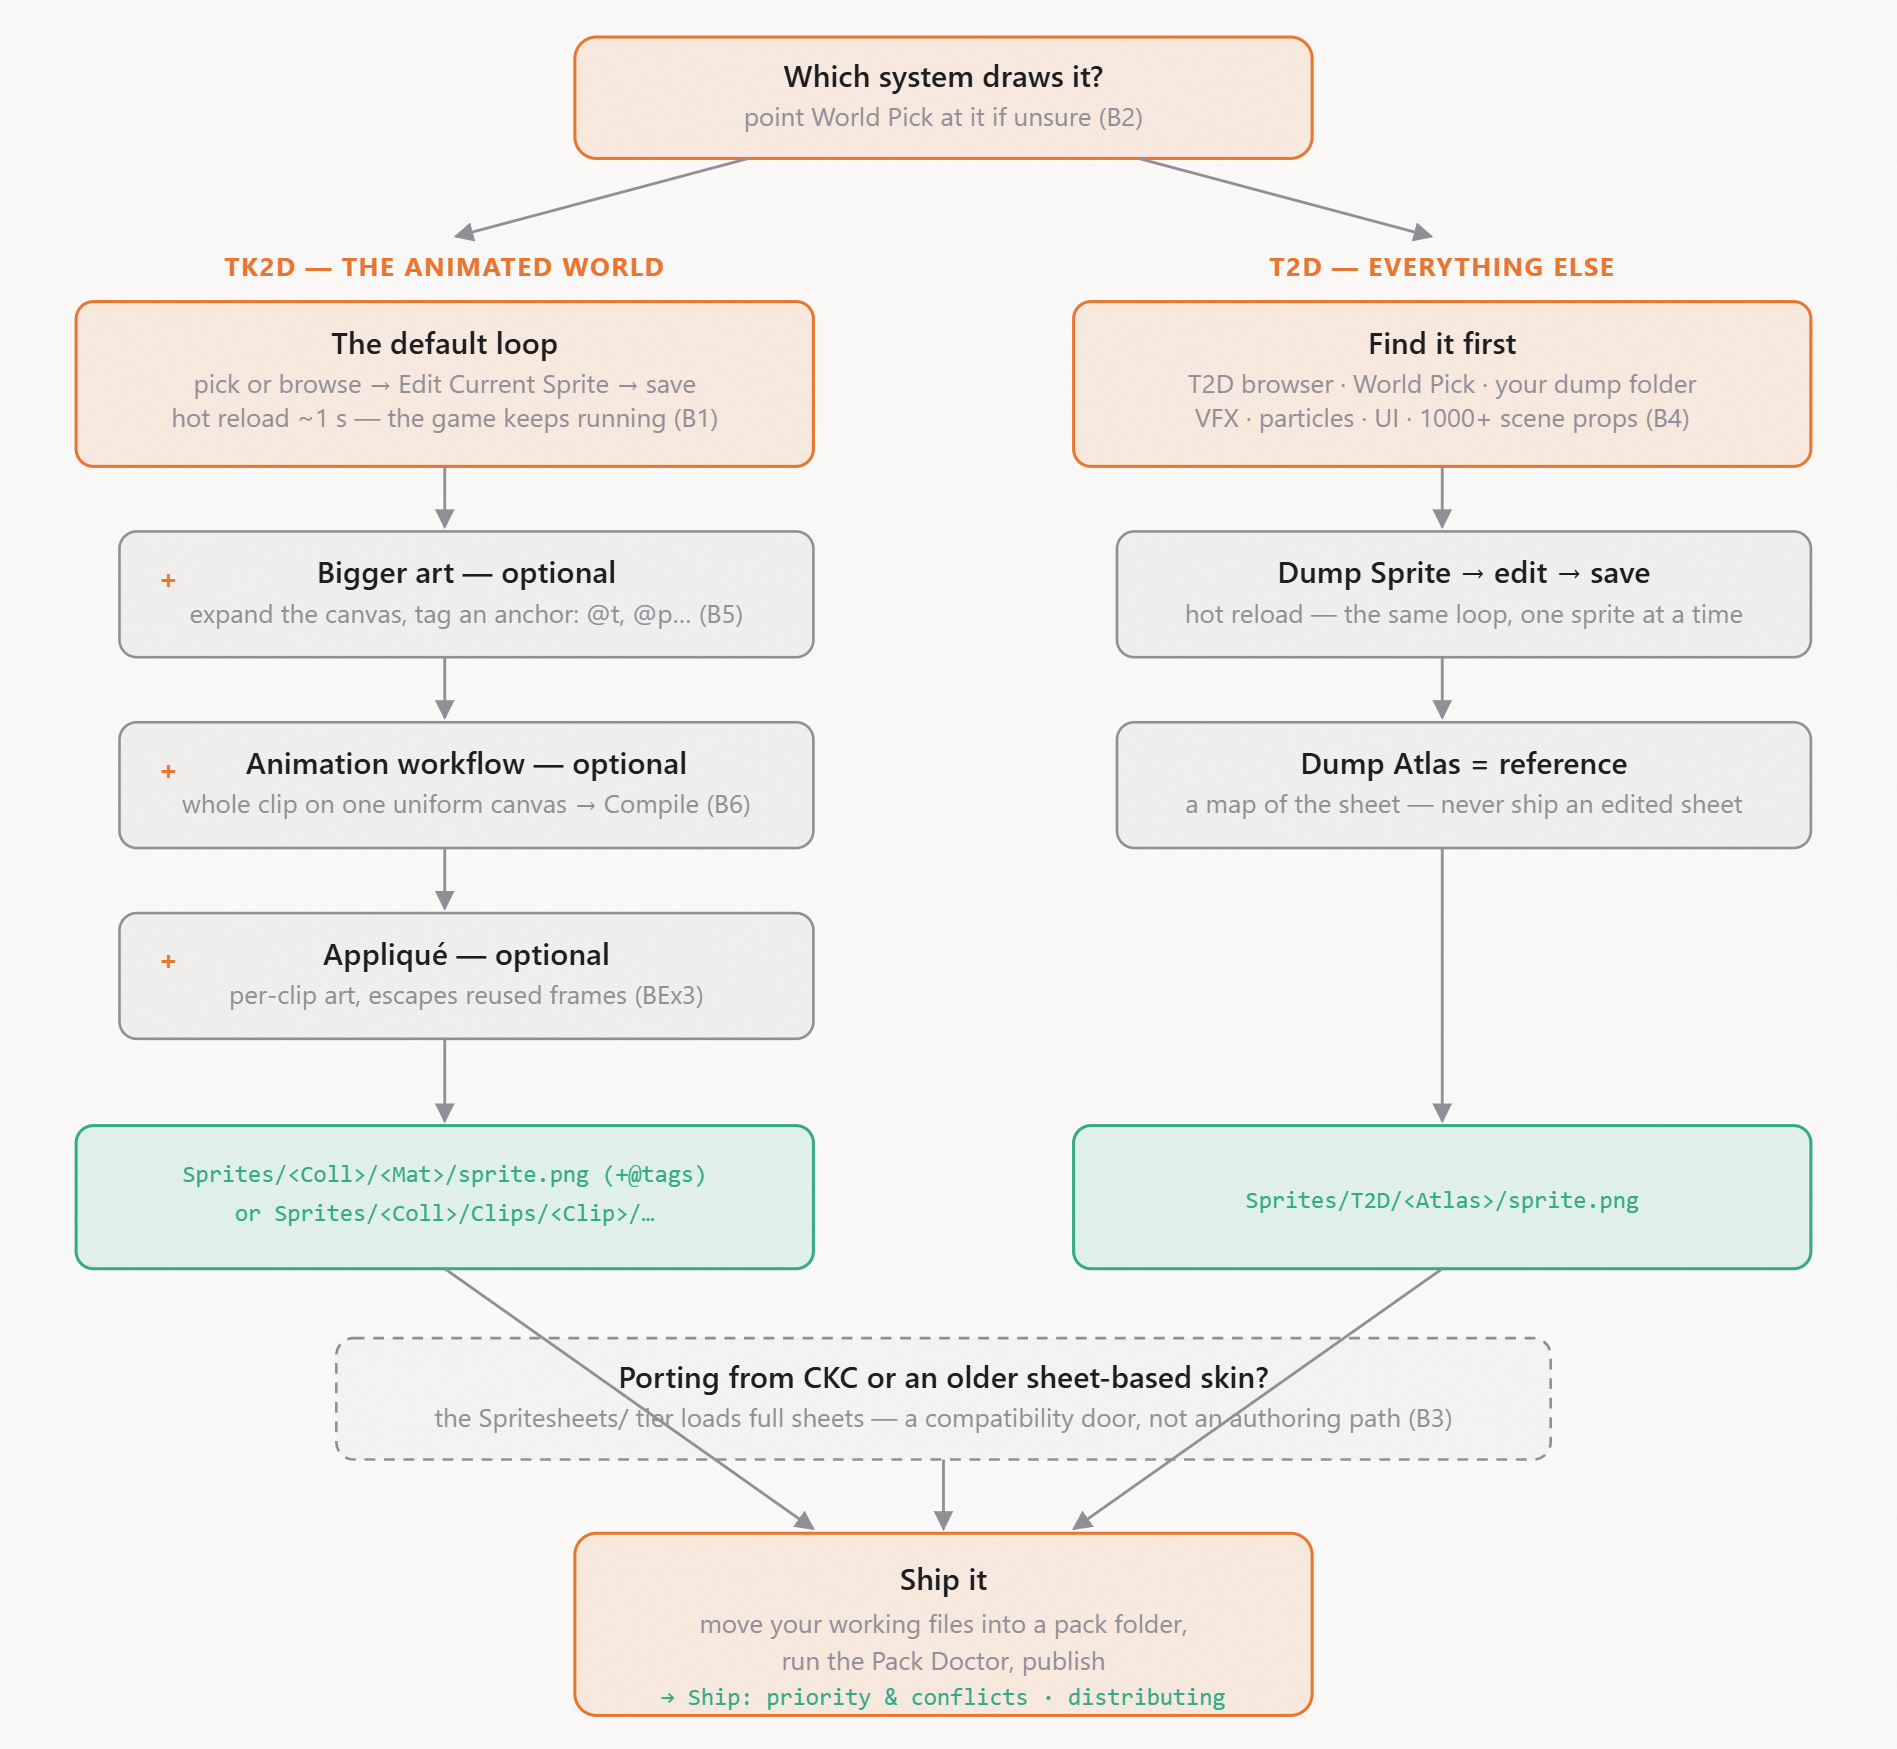
The tk2d trunk: one loop, three optional layers
There is only one tk2d workflow — the default loop — and everything else stacks on top of it as optional gear. You never leave the game.
The default loop (Starting a Skin Pack): open the Animation tab, pick your target — the selector lists every animated tk2d object in the scene and the static tk2d objects (refreshed each time you enter a scene), or land there instantly with a World Pick. Click Edit Current Sprite, paint, save. About a second later the game is wearing your art. Repeat, sprite by sprite, until the thing looks right.
+ Bigger art (Anchors): when your replacement needs
more room than the vanilla sprite had, just make the canvas bigger and
tell Stitchwork how to place it — a filename tag like @t (top) or the
precise @p120_40. The atlas grows to fit. Still the same loop; you've
only changed the file you save.
+ The animation workflow (Animation Canvas): the default loop edits an animation one frame at a time, and each frame's sprite has its own crop and position on the atlas — lining art up across frames by eye is where skins get shaky. The canvas workflow fixes that structurally: Extract hands you every frame of a clip on one uniform, registration-correct, onion-skinned canvas; you edit frames in place, knowing they line up by construction; Compile splits the canvas back into per-sprite files (bigger-art placement included — it writes the anchor tags for you). The honest trade: your loop becomes save → Compile → see instead of save → see. One caution until we refine it: Compile writes back every frame it can read — including frames you didn't touch — so if you have earlier hand-edited files for those same sprites, know that a compile lands on top of them (details and current behavior in B6).
+ Appliqué (per-clip art): tk2d reuses frames —
the same sprite can appear in several different animations, so changing
it changes all of them. When that's not what you want, Appliqué gives
one specific clip its own private art via the Clips/<ClipName>/
folder. Optional, per-clip, stacks with everything above.
The T2D trunk: find it, then the same loop
T2D sprites are a different beast — not because editing them is harder,
but because finding them is. The game uses plain Texture2D sprites
everywhere and for everything: an attack's visual effect, a particle
system's texture, UI and menus, and static scene decoration by the
hundreds. For a long time the only way in was dumping everything and
learning Team Cherry's internal names the hard way.
That era is over. Three finders, in the order to try them:
- World Pick — point at the thing on screen; a T2D hit opens the browser with it selected.
- The T2D browser (Dev Hub → Graphics → T2D Textures) — every texture in the scene, with previews, searchable by clean name.
- Your dump folder — for things that are hard to catch live (Dumping). A busy effect too fast to pick? A companion mod like DebugMod can freeze time while you line up the shot (companion mods).
Once found, the loop is the one you already know: Dump Sprite, edit,
save, hot reload. One PNG per sprite, at
Sprites/T2D/<AtlasName>/<sprite>.png.
Dump Atlas is also there — as a reference. It shows you the whole sheet: what lives together, each sprite's bounding box, how much room a slot has. Keep it open beside your editor; don't edit and ship it (why not: B3 — sheet layouts and names change with game updates, and your file silently stops matching).
Not a workflow: spritesheets
You'll notice neither trunk ends in a spritesheet. That's deliberate. Editing art directly on an atlas sheet means lining up animation frames by eye across scattered crops — the classic source of shaky, jittery skins. Every tool that community has built since — CKC with its per-animation preview, our animation canvas with its uniform frames — exists to get away from drawing on sheets.
The Spritesheets/ tier still loads, and loads well — because it's the
porting door. If you have prior work from Custom Knight Creator
(a standalone skinning tool we happily coexist with) or an older
sheet-based skin, it drops in and runs. That story, including the
exact-match rule and the T2D caveats, is
Porting Prior Work.
Take the library with you
One more tool that isn't a workflow but serves them all: the full-game dump (Dumping) exports the entire asset library to disk. Creators use it to work away from the game — copy the files you intend to change onto a tablet, paint on the couch or the train, drop the finished PNGs into your working folder when you're back. The dumped files are named and foldered exactly the way replacements expect, so "port what I changed" is a copy-paste.
Where they all end
Every workflow finishes in your working folder — the Stitchwork/
directory next to the DLL — where hot reload picks files up the second
you save. When the art is done, the working folder's Sprites/ (and
friends) move into a pack folder, the Pack Doctor lints it
(Pack Manager → scan), and
Distributing Your Pack takes it from there.
The full path grammar for every tier lives in
Sprite Paths.
Pages
- A-0 Wikis
- A1 - Getting Started
- A2 - Installing Packs
- A3 - The Pack Manager
- A4 - How Stitchwork Works
- A5 - When Something Looks Wrong
- AEx1 - Conditional Activation
- B0 - Choosing a Workflow
- B1 - Starting a Skin Pack
- B2 - Finding Any Sprite
- B3 - Porting Prior Work — Spritesheets & CKC
- B4 - Texture2D (T2D) Sprites
- B5 - Bigger Art — Anchors
- B6 - Animation Canvas Workflow
- B7 - Sprite Paths Reference
- B8 - The Animation Controller
- BEx1 - Reused frames — one sprite, many animations
- BEx2 - Instance-specific paths — same name, different art
- BEx3 - Appliqué: Per-Clip Art
- C1 - Text & Dialogue
- D1 - Audio
- E1 - Video
- F1 - Priority & Conflicts
- F2 - Distributing Your Pack
- G1 - Dumping & Full Dump
- G2 - Companion Mods
- G3 - Hotkeys
- G4 - Pack Folder Structure
- G5 - Testing With Savestates (DebugMod)
- G6 - Troubleshooting
